
In this DIY post, learn how to display dynamic information on a SharePoint workflow initiation form with SharePoint Lists, rather than InfoPath.
Environments: SharePoint 2013 and SharePoint Online
Scenario: You need to display dynamic information on a SharePoint workflow initiation form.
Solution: Utilize an OOTB SharePoint list to be used as your workflow initiation form instead of using the InfoPath option to customize the OOTB designer workflow form.
Description: I’ve run into situations where the requirements dictated that dynamic information be displayed in SharePoint (not via email) when a workflow is being initiated. This post will describe how to use a “supporting” custom SharePoint list to display the initiation form information and trigger the workflow against the “target” list. This solution only uses client-side technologies: jQuery and SharePoint’s CSOM.
Creating the Custom Workflow Form
Step 1 – Create your SharePoint List That Requires a Workflow
Create a new SharePoint list that will ultimately have the workflow run against. Here is the example list that I am using for this post:
List name = “RandomApproval”

I created a single item in this list:
Step 2 – Create your SharePoint Initiation Form List
Create a new SharePoint list to be used as your workflow initiation form. For this example I’m going to add a couple of additional columns to the list:
List name = “StartWFInitiationForm”
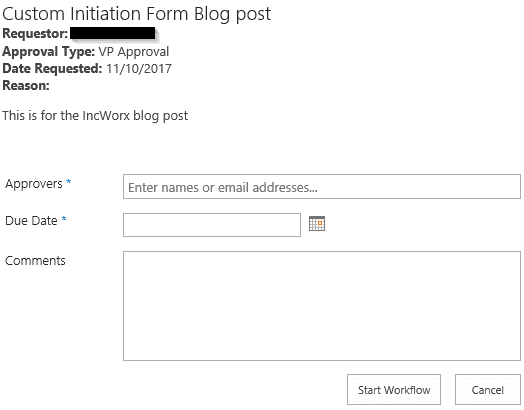
- Approvers (multiple people column) *required
- Due Date (Date only) *required
- Comments
- TargetItemID (number, 0 decimals) – this will store the List Item ID we will be targeting
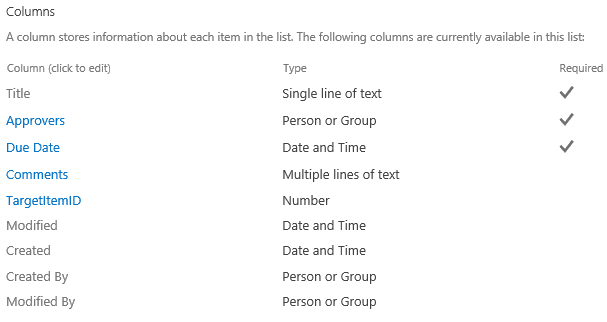
A benefit to using a SharePoint list as our initiation form is that SharePoint does all the work for you when it comes to the OOTB functionality such as required fields, people picker, etc… It also provides an easy way to track additional/custom information pertaining to the initiation should you want to include that level of auditing.
Step 3 – Modify the Default New Form on the StartWFInitiationForm List
Go to the List tab on the new list and edit the “Default New Form” and then edit the page.
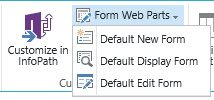
This will bring you to your traditional web part page view of the default new form. Now you add a script editor web part to the top of the form.
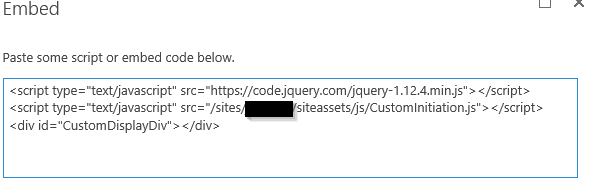
n the script editor you can load jQuery, if not already being loaded on your site, and then all the work will happen in the next 2 lines.
- CustomInitiation.js – a custom JavaScript file that will load all the information we want to display on the form; we’ll create this file in the next step
- HTML div “CustomDisplayDiv” will be the placeholder to insert the custom information we want to display
Step 4 – Code the CustomInitiation.js file
Here is where the “heavy lifting” starts. In this example, I am just pulling back information from the target list item to be displayed on the custom initiation form. This script:
- Retrieves the target item ID we want to start the workflow on from the URL QueryString
- Uses CSOM to populate the initiation form with custom information
//Create your JavaScript Namespace
var INCWORX = INCWORX || {}
INCWORX.SP = INCWORX.SP || {}
INCWORX.SP.WFInitiation = {
itemID: null,
targetItem: null,
init: function() {
// Hide columns that the user does not need to see
$ ("[id^='Title']").closest('tr').hide();
$ ("[id^='TargetItemID']").closest('tr').hide();
// Change the "Save" button to say "Start Workflow"
$ ("[id$='SaveItem']").prop('value', 'Start Workflow');
// Retrieve the List Item ID from the query string that this workflow will be targeting
INCWORX.SP.WFInitiation.itemID = $.getUrlVar('itemid');
if(!INCWORX.SP.WFInitiation.itemID)
{
// Add some custom message incase the target item ID was not found in the QueryString
$ ("#CustomDisplayDiv").html("ERROR: The item ID was not located.");
$ ("[id$='SaveItem']").hide(); // Hide the Save button so the form cannot be submitted}
// Set the target item ID in the custom column we created so we have access to it after the form is saved
$ ("[id^='TargetItemID']").val(INCWORX.SP.WFInitiation.itemID);
$ ("[id^='Title']").val("Custom Initation for " + INCWORX.SP.WFInitiation.itemID);
// Build your client context
var clientContext = new SP.ClientContext();
var web = clientContext.get_web();
// Retrieve the list of the target item
var list = web.get_lists().getByTitle("RandomApproval");
// Retrieve the target item with the columns we will display on the initiation form
INCWORX.SP.WFInitiation.targetItem = list.getItemById(INCWORX.SP.WFInitiation.itemID, "Include(Title,ApprovalType,DateRequested,Reason,Author)");
clientContext.load(INCWORX.SP.WFInitiation.targetItem);
clientContext.executeQueryAsync(Function.createDelegate(this, INCWORX.SP.WFInitiation.onQuerySucceeded), Function.createDelegate(this, INCWORX.SP.WFInitiation.onQueryFailed));
},
onQuerySucceeded: function() {
var displayDiv = $ ("#CustomDisplayDiv");
// Retrieve the columns to be displayed on the initiation form
var itemTitle = INCWORX.SP.WFInitiation.targetItem.get_item("Title");
var itemApprovalType = INCWORX.SP.WFInitiation.targetItem.get_item("ApprovalType");
var itemDate = new Date(INCWORX.SP.WFInitiation.targetItem.get_item("DateRequested"));
var itemReason = INCWORX.SP.WFInitiation.targetItem.get_item("Reason");
var itemAuthor = INCWORX.SP.WFInitiation.targetItem.get_item("Author").get_lookupValue();
displayDiv.append("<h2>" + itemTitle + "</h2>");
displayDiv.append("<strong>Requestor: </strong>" + itemAuthor);
displayDiv.append("<br >");
displayDiv.append("<strong>Approval Type: </strong>" + itemApprovalType);
displayDiv.append("<br >");
// Format the date, remember that getMonth is 0 based
displayDiv.append("<strong>Date Requested: </strong>" + (itemDate.getMonth()+1) + "/" + itemDate.getDate() + "/" + itemDate.getFullYear());
displayDiv.append("<br >");
displayDiv.append("<strong>Reason: </strong>" + itemReason);},
onQueryFailed: function(sender, args) {
$ ("#CustomDisplayDiv").html("ERROR: " + args.get_message());
}}
jQuery (document).ready(function ()
{
// Function to retrieve QueryString parameters from the URL
$.extend({
getUrlVars: function(){
var vars = [], hash;
var hashes = window.location.href.slice(window.location.href.indexOf('?') + 1).split('&');
for(var i = 0; i < hashes.length; i++)
{
hash = hashes[i].split('=');
vars.push(hash[0]);
vars[hash[0]] = hash[1];
}
return vars;
},
getUrlVar: function(name){
return $.getUrlVars()[name];
}
});
// Make sure the custom JavaScript is loaded after the SharePoint client object model is loaded
SP.SOD.executeFunc('sp.js','SP.ClientContext',INCWORX.SP.WFInitiation.init);
});
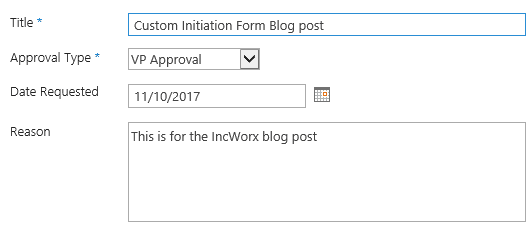
The resulting display of the New Item form on the custom Initiation list should look like the following.:
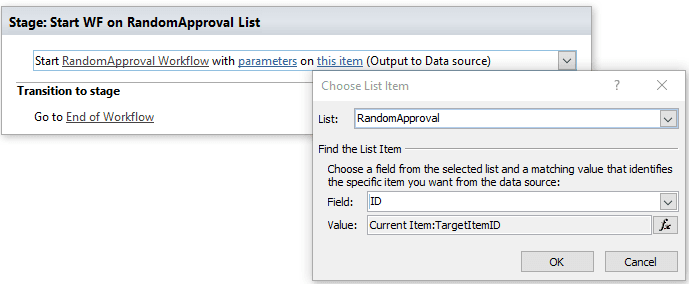
Step 5 – Initiation Form 2013 Designer Workflow
Create a SharePoint 2013 Designer workflow on your initiation list. We need to use a 2013 workflow so we can trigger a 2010 workflow on the target list. In this workflow, you can access the information the user entered on the Initiation form to start the workflow on the target list (the “RandomApproval” list). You can pass in the values from the initiation form as parameters to the 2010 workflow.
Step 6 – Add a Custom View Ribbon Action
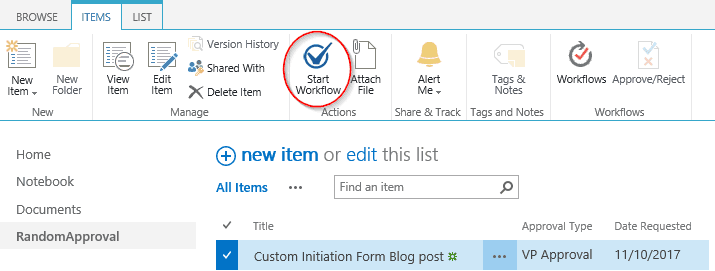
Using SharePoint Designer, add a custom view ribbon action to the target list (RandomApproval) so users can launch the initiation form from the SharePoint list.
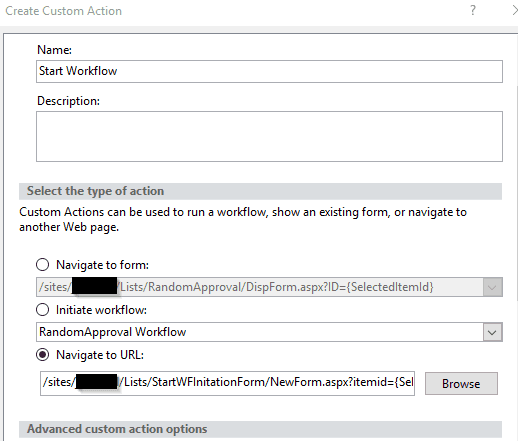
The Navigate to URL field contains: /sites/<your site>/Lists/StartWFInitationForm/NewForm.aspx? itemid={SelectedItemId} . Pass the “itemid” QueryString parameter as the SelectedItemId property to the NewForm.aspx page. That way it can be retrieved from our custom initiation form on load.
Conclusion
While not every workflow initiation form needs to be this complicated, it is a great tool to have in your pocket knowing you can create a custom workflow initiation form without the need for InfoPath, SharePoint App or deploying code. It will come in handy when users want to display dynamic information on the form. So at the end of this blog post, this is what we have accomplished:
- Created a list that we want to run a workflow against
- Created a “supporting” list that we use for our workflow initiation form
- Added custom JavaScript to the initiation form NewForm.aspx to populate custom information we want to display to the user starting the workflow
- Added a SharePoint Designer 2013 workflow on the initiation form list that runs when an item is created which then triggers the actual workflow that resides in the target list
- Added a custom View Ribbon action to the target list so users can easily go to the custom workflow initiation form
There are also countless other value-add features that can be accomplished with our custom workflow initiation form just using client-side scripting, some examples:
- Dynamic required fields –research the “PreSaveAction” function for SharePoint forms
- Pre-populate fields on form load
- Populate fields based on what the user selects on the form
- Validate that the workflow can be started
- Verify a document is not checked out
- Verify that the item is at the appropriate “state” to be started (the previous workflow was completed/approved)