Microsoft Flow not only makes integrating multiple, disparate systems possible but is sometimes fairly simple depending on the underlying systems and business requirements.
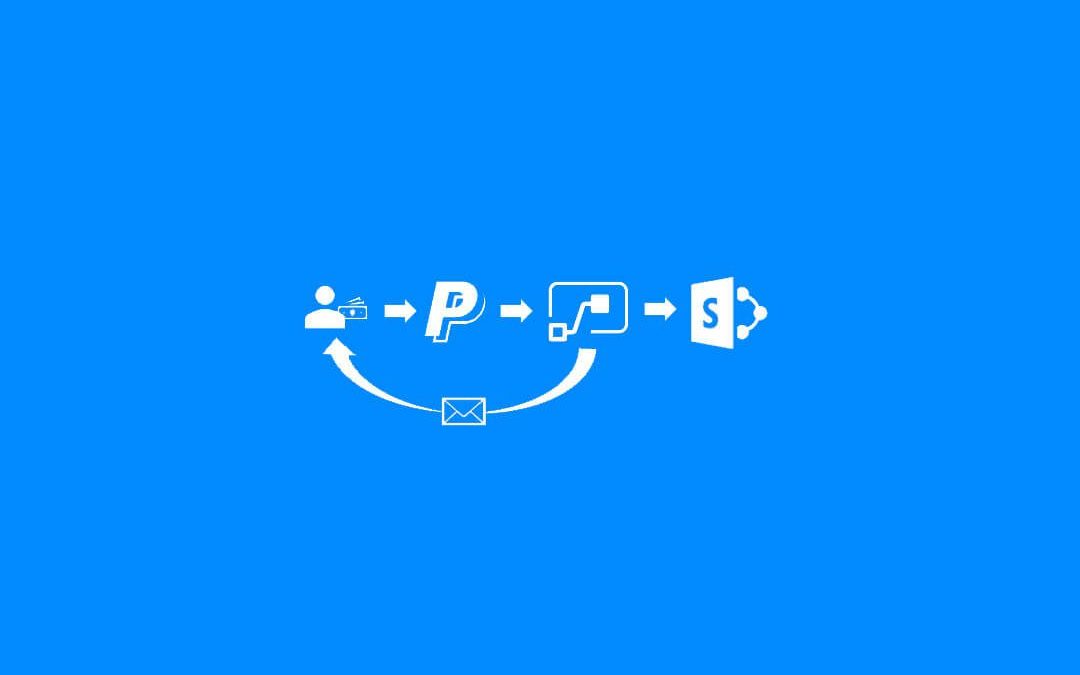
In this step-by-step guide, we’ll demonstrate how to use Flow to receive instant payment notifications (IPN) from PayPal, send a custom email confirmation to the customer, and add payment transaction details to a SharePoint list.
Overview
This post demonstrates how to use Microsoft Flow to integrate PayPal and SharePoint.
Prerequisites
The following is required to integrate PayPal with SharePoint using Microsoft Flow (Power Automate).
- Office 365 tenant with SharePoint Online
- Microsoft Flow (Power Automate) license
- PayPal sandbox account
Step By Step Guide to Integrate Paypal and SharePoint
Step 1: Create the SharePoint List
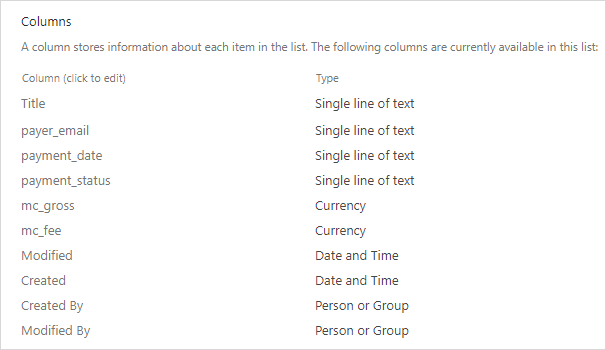
We will be storing a subset of the payment transaction details sent via PayPal’s IPN message in a SharePoint list. Within your test Office 365 instance, create a new SharePoint list named “Payments” and add the following fields:
- payer_email
- payment_date
- payment_status
- mc_gross
- mc_fee
Once complete, the SharePoint list columns should appear as follows:
Step 2: Create the Microsoft Flow (aka. IPN Listener)
Begin by signing into your test Office 365 instance and follow these steps:
Step 2.1: Create a New Flow
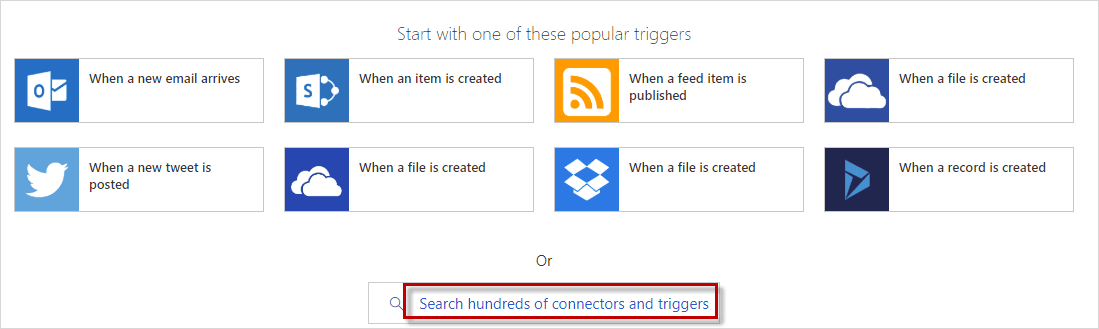
Go to your “My flows” page and click “Create from blank” to create a new Flow.

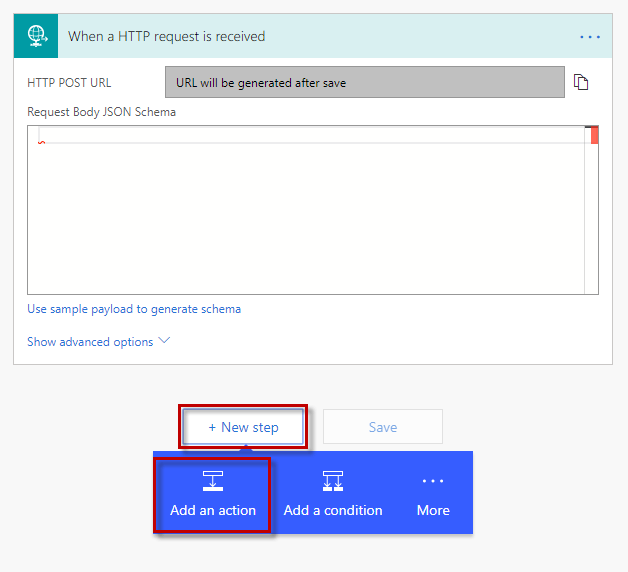
The first thing we’ll want to add to our Flow is a trigger. In the next few steps, we’ll be adding the HTTP Request trigger which PayPal will call with the IPN message containing payment transaction details.
Step 2.2: Click in the search box.
Step 2.3: Type “http”, then choose “Request – When a HTTP request is received”.
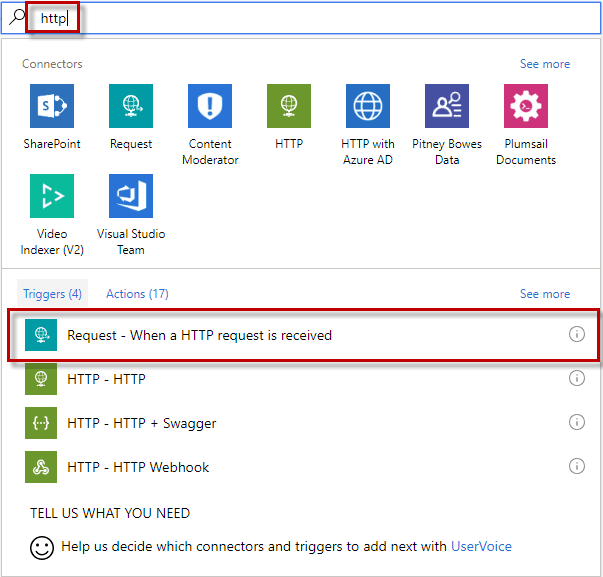
Now, our HTTP Request trigger has been added to the Flow. No further configuration is required at this time. Once we’re done creating our Flow and saving it, the unique URL for invoking the trigger will be assigned automatically.
A quick overview of PayPal’s IPN process… when a payment transaction occurs in PayPal, the URL that is assigned to receive the IPN message (the URL of your trigger) will be called and the payment transaction details will be included in the body of the request. PayPal supports a callback method to verify the information you received was in fact from PayPal and is valid. You invoke PayPal’s callback method by posting the entire original body that was received by your trigger along with “&cmd=_notify-validate” appended to the end of the body. PayPal will return a status code of 200 with a body of “VERIFIED” for valid transactions.
The next thing we want to do immediately after the trigger is include an action for calling PayPal to verify the transaction is valid.
Step 2.4: Click “New step” followed by “Add an action” to add a new action to the flow.
Step 2.5: Type “http” in the search box and choose “HTTP – HTTP”.

Step 2.6 Configure the HTTP Callback
Configure the HTTP callback to PayPal by setting the following settings:
- Method: POST
- Uri: Use the current PayPal IPN verification endpoint as documented in the official PayPal developer documentation for IPN.
- Body: Include the full IPN message content from triggerBody() and append the validation command so that the payload is sent back to PayPal for verification, for example:
triggerBody() & “&cmd=_notify-validate”
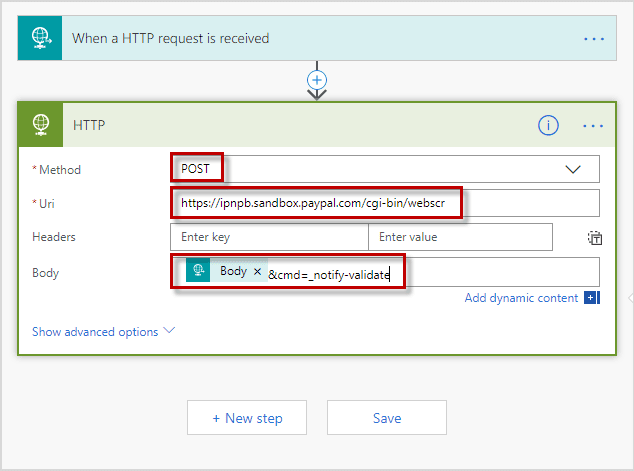
A few things to note regarding the fields above. The Uri specified is to PayPal’s sandbox IPN validator. Use live IPNs for production.
In addition, the Body field contains the Body output from our trigger (which is the body received in the HTTP Request) with the “&cmd=_notify-validate” appended to the end. This is what PayPal expects to receive. Next, we’ll want to check the results of the call to PayPal by adding a condition then take the appropriate action based on the results.
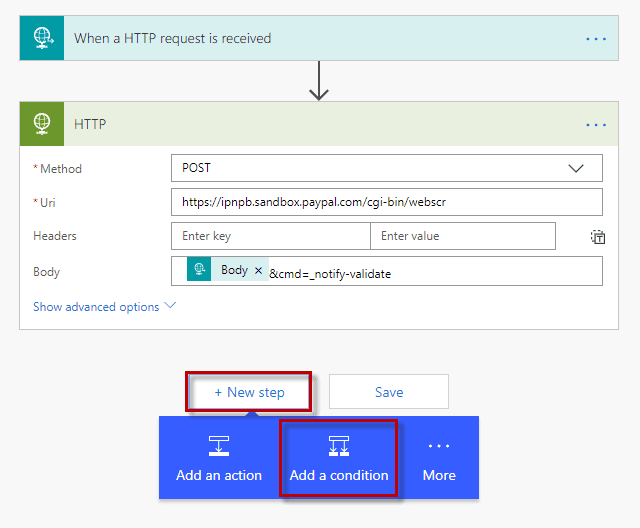
Step 2.7: Add a Condition to the Flow
Click “New step” followed by “Add a condition” to add a new condition to the flow.
Step 2.8: Click “Edit in advanced mode”
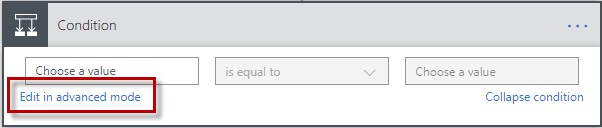
Step 2.9: Paste the Following Condition
Paste the following condition in the advanced mode text field provided.
@AND(equals(outputs(‘HTTP’)[‘statusCode’], 200), equals(body(‘HTTP’), ‘VERIFIED’))
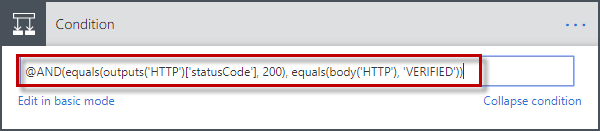
By using AND, the above condition will return true only if both conditions are met: status code = 200 and the response body = “VERIFIED”.
For purposes of this walkthrough, we’ll continue processing the Flow only if the condition returns true. In a real-world scenario, we might want to perform one or more alternative actions when our condition returns false such as sending an email to an administrator to investigate, logging the invalid request to a separate SharePoint list, etc.
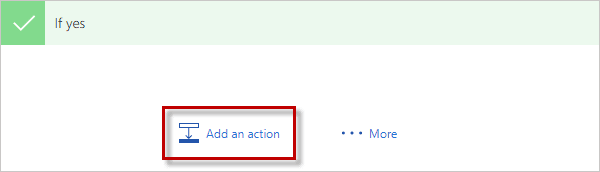
The remainder of this section will focus on actions added when the payment transaction is valid, including sending an email to the payer and adding an item to a SharePoint list.
Step 2.10: Click “Add an action” within the “If yes” card.
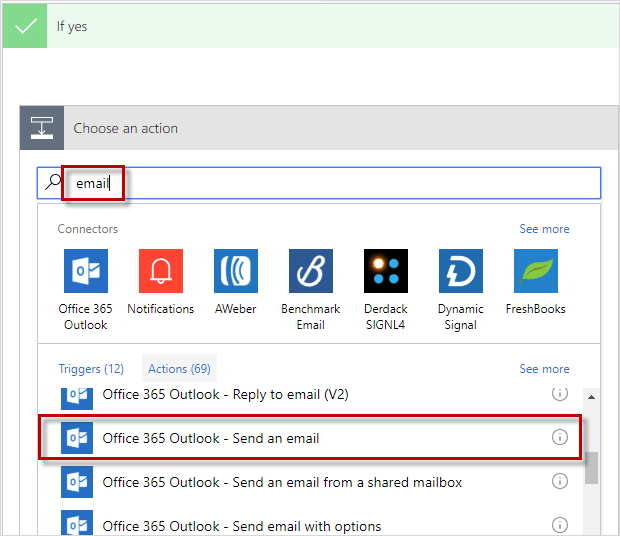
Step 2.11: Type “email” in the search box and choose “Office 365 Outlook – Send an email”.
Step 2.12: Configure the email by setting the following fields:
- To: contains 1 expression: triggerFormDataValue(‘payer_email’)
- Subject: contains plain text
- Body: contains plain text and 2 expressions: triggerFormDataValue(‘first_name’) and triggerFormDataValue(“mc_gross”)

A few things to note regarding the fields above. The request body received from PayPal via our HTTP Request trigger is x-www-form-urlencoded. We’re using Flow’s built-in function triggerFromDataValue() in our expression to retrieve the values from the form-encoded trigger output.
Step 2.13: Choose an Action
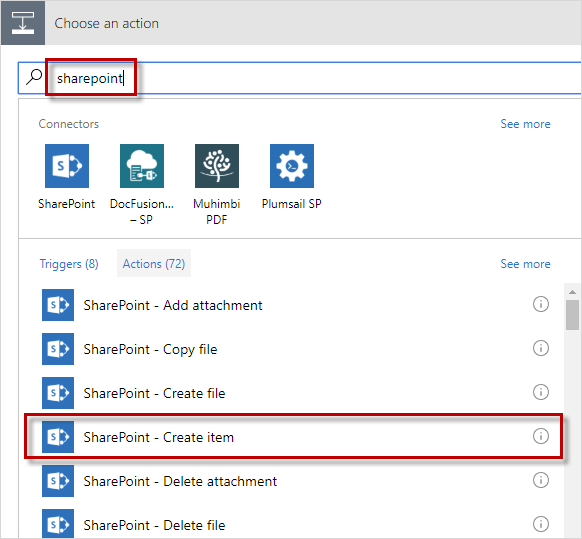
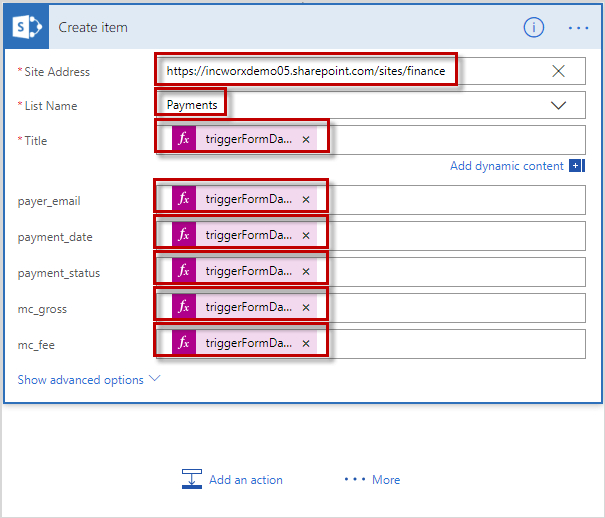
Click “Add an action” in the “If yes” card, then type “sharepoint” in the search box and choose “SharePoint – Create item”.
Step 2.14: Populate the fields for the new SharePoint list item as follows:
- Site Address: enter the URL to the SharePoint site containing your list created in Step 1
- List Name: choose the SharePoint list created in Step 1
- Title: expression: triggerFormDataValue(‘invoice’)
- payer_email: expression: triggerFormDataValue(‘payer_email)
- payment_date: expression: triggerFormDataValue(‘payment_date’)
- payment_status: expression: triggerFormDataValue(‘payment_status’)
- mc_gross: expression: triggerFormDataValue(‘mc_gross’)
- mc_fee: expression: triggerFormDataValue(‘mc_fee’)
Step 2.15: Click “Save” to save the Flow
![]()
![]()
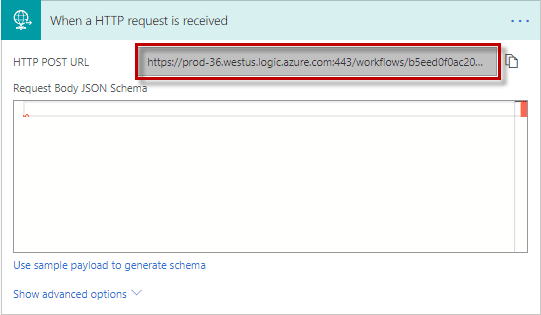
Step 2.16: Copy the HTTP Request trigger URL
Upon saving your Flow, the URL for our HTTP Request trigger is automatically populated with a unique URL. Copy the URL. We will need it for step 3 when we configure PayPal’s IPN settings.
Step 3: Enable IPN in PayPal
Begin by signing into your sandbox PayPal account.
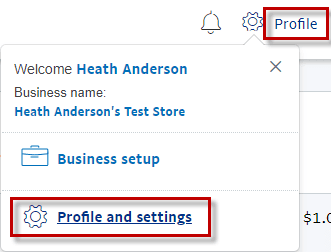
Step 3.1: After signing in, go to Profile, then Profile and settings.
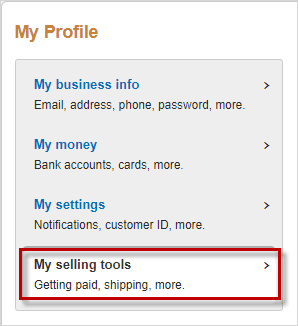
Step 3.2: Click “My selling tools”
Step 3.3: Locate “Instant payment notifications” and click “Update”

Step 3.4: Click “Choose IPN Settings”

Step 3.5: Populate the fields and click “Save”
- Notification URL: enter the URL copied from step 2.16
- IPN Messages: choose Receive IPN messages (Enabled)

Your PayPal sandbox account is now configured to send IPN messages to your Microsoft Flow as transactions are processed.
Step 4: Test the Solution
For our test, we’ll create a new invoice using our PayPal sandbox account. Then, we’ll pay that invoice with a test credit card.
Upon payment, PayPal will invoke the Flow and we’ll receive our email confirmation and payment transaction details will be added to our SharePoint list.
Note: PayPal does provide an IPN Simulator which has unfortunately proven unreliable for sandbox testing (it seems to work well for production testing).
As a result, I’ve opted to avoid the use of the simulator for testing our listener and instead use test payment transactions submitted through the sandbox site. It’s more like the “real thing” anyway, and you won’t need a separate developer account for logging in to PayPal’s Developer Portal.
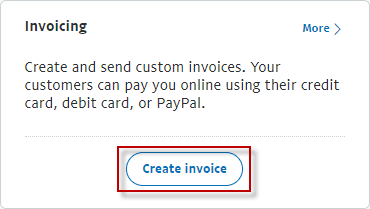
Step 4.1: Sign in to your PayPal sandbox account and click “Create invoice”
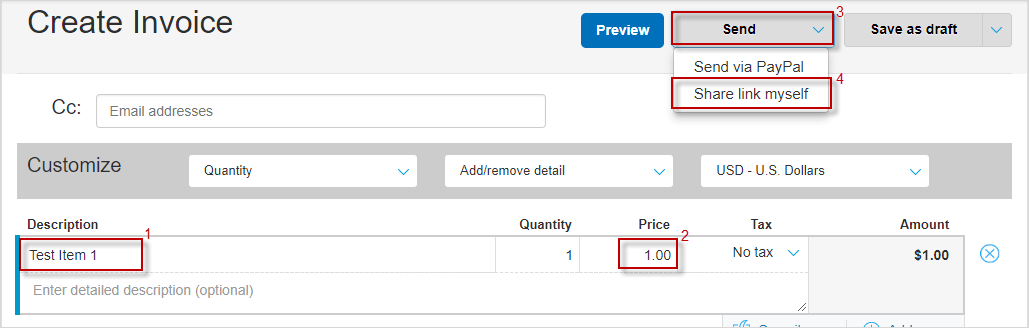
Step 4.2: Populate the necessary fields and click to send the invoice
- Enter a value for Description
- Enter a value for Price
- Click “Send”
- Click “Share link myself”
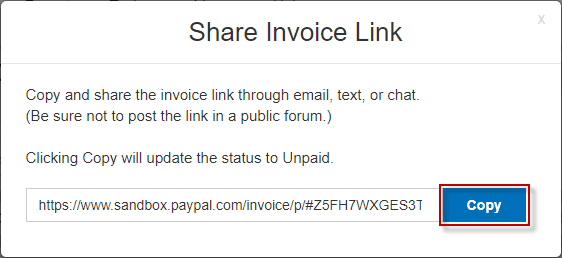
Step 4.3: Click “Copy” to Copy the Invoice URL
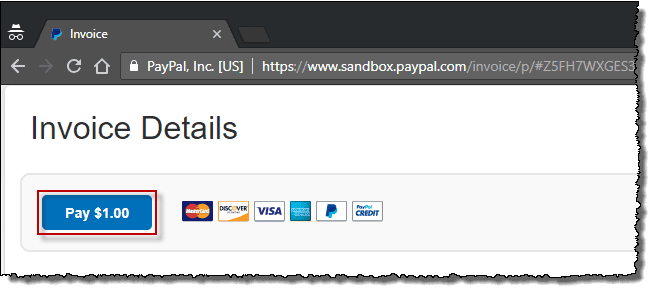
Step 4.4: Use a new Incognito or In-Private browser window to visit the invoice URL and click Pay.
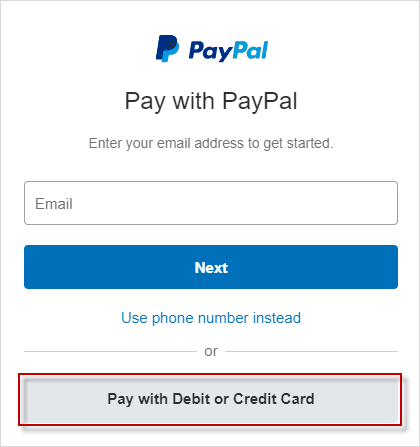
Step 4.5: Click “Pay with Debit or Credit Card”
This option allows us to pay the invoice with a credit card using guest checkout.
Step 4.6: Populate all required fields with sample data and click the “Pay Now” button located at the bottom of the form.
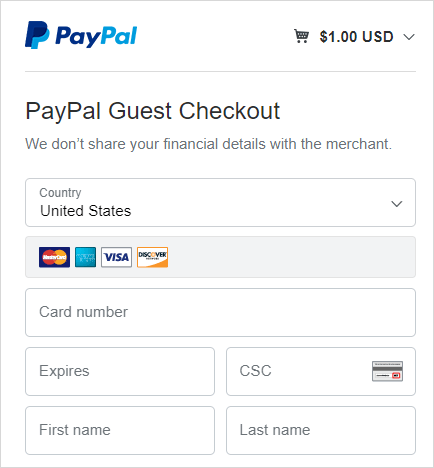
A few things to note regarding the fields above. PayPal offers a random credit card number generator for testing purposes.
Some test credit cards do not function, so don’t hesitate to try another if one fails.
Also, be sure to enter a valid email address if you want to receive the confirmation email that is being sent to the payer by our Flow.
The email address you specify must be different than the one tied to your PayPal sandbox account.
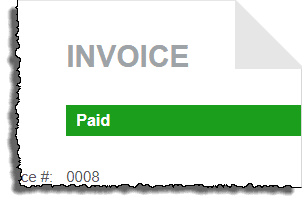
If successful, you will PayPal will display the invoice marked “Paid” as follows:
Step 4.7: Verify your Flow Ran Successfully
Verify your flow ran successfully by going to My Flows in your test Office 365 instance and viewing the run history.
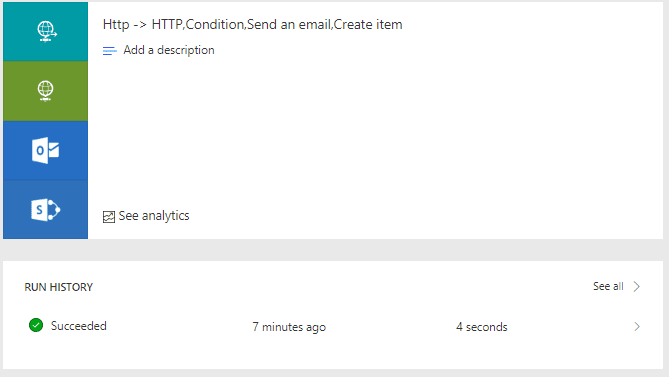
Step 4.8: Review Run History
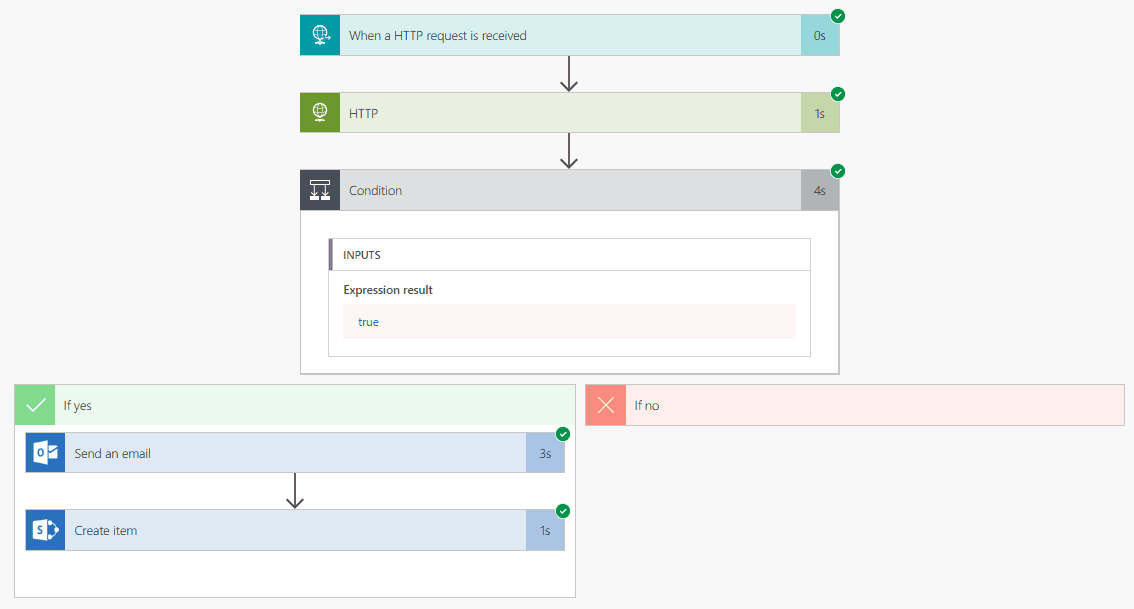
Click the entry in the run history section to view the Flow. A green check mark will be next to each task that was executed successfully as shown below.
Step 4.9: Review Email
Check your inbox for the email address you entered during checkout. You should have received an email similar to the following:

Step 4.10: Verify New List Item
Verify a new list item has been created in the “Payments” list of your test SharePoint site.

What you’ve learned (hopefully):
- How to configure and listen for HTTP requests (trigger)
- How to send a POST to a URL and process the response (action)
- How to use a multi-condition if/then clause using AND (condition)
- How to send an email from Flow (action)
- How to create a SharePoint list item from Flow (action)
- How to access the key/value pairs from the body of an x-www-form-urlencoded result
Thanks for reading!