What if a single app could give your workplace efficiency a major boost?
It may sound too good to be true but Microsoft Planner offers all of the tools that you need to boost efficiency for both you and your staff.
Wondering how to use Microsoft Planner to achieve this kind of productivity power? Keep reading to discover the secrets!
What Is Microsoft Planner?
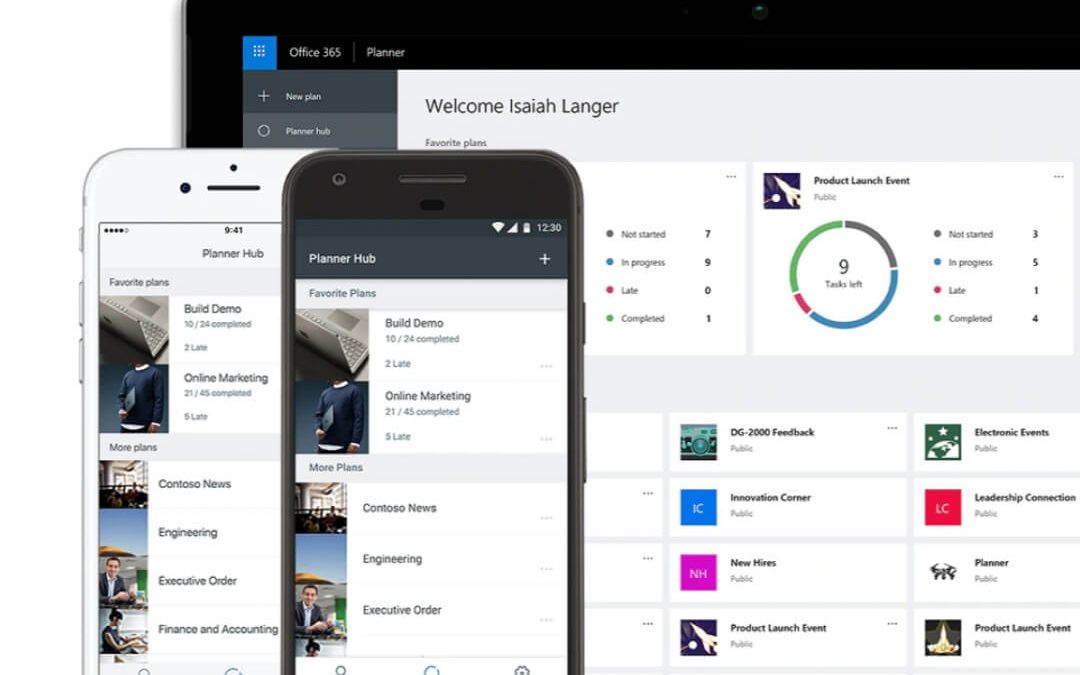
Microsoft Planner is a tool within the Office 365 suite. It improves teamwork by organizing an Office 365 group or team’s tasks, files and conversations.
Planner is easily accessed through a browser, within Microsoft Teams or through a mobile app for Android and iOS.
How to use Microsoft Planner for Project Management?
Microsoft Project is the ultimate in project management tools but it is also complex and expensive.
If you are not ready to jump into full project management software, you may benefit dramatically from utilizing Microsoft Planner instead.
Planner is simple, easy to use for new users and included in the licensing for Office 365 users.
Many of the project management features required are included in Planner. Features such as progress tracking, task assignment and management and reminders are included.
Keep reading to see how your team can quickly become more productive utilizing the Microsoft Planner productivity boosts!
How to use Microsoft Planner in Microsoft Teams?
As outlined above, Microsoft Planner can provide substantial productivity gains by making it easy for your team to find project plan information.
These gains can be further increased by utilizing Planner within Microsoft Teams. You can do this easily from the Teams interface.
Navigate to Your Microsoft Team
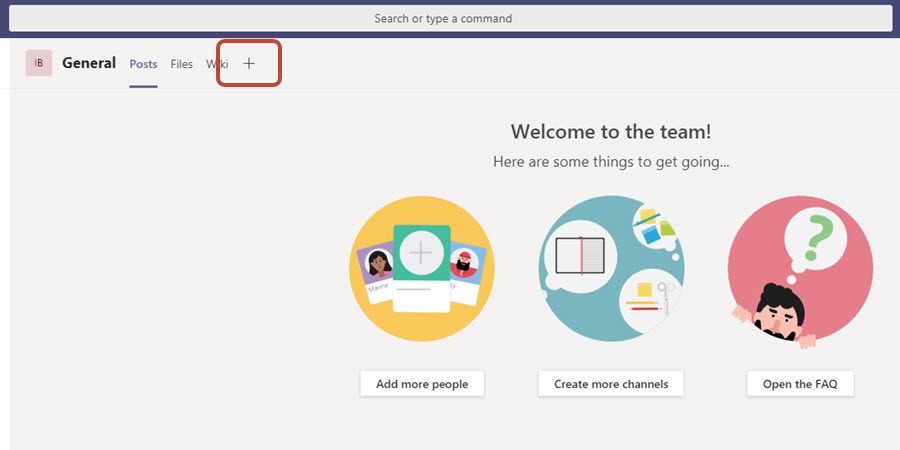
In Microsoft Teams, use the left navigation to get to the team where you would like to create a plan.
Add a Microsoft Planner Tab
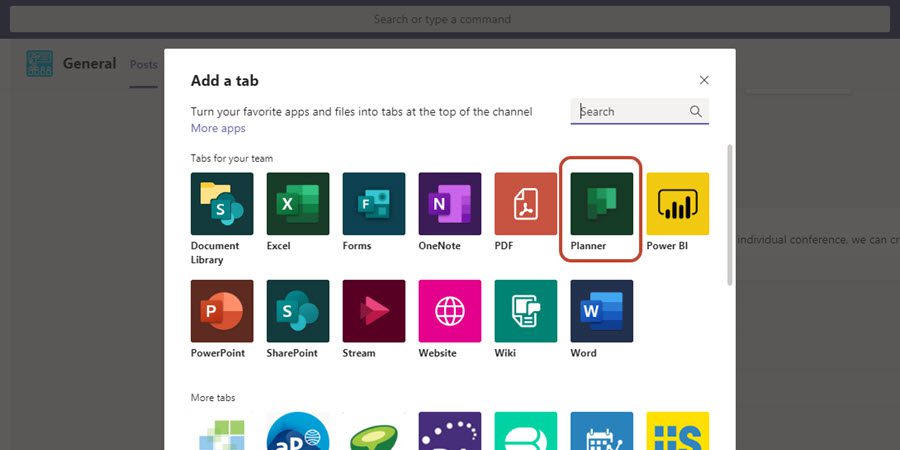
At the top of the Team, click the “+” plus sign to add a tab. From the list of Tabs, select Planner.
Name your Microsoft Planner Tab
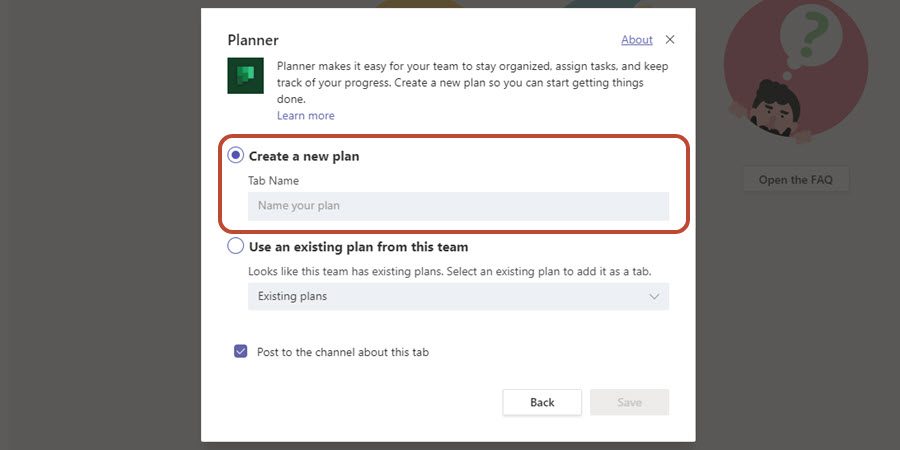
On the next screen, give your Planner tab a name. If you have already created a plan in another channel, you can also select to re-use it.
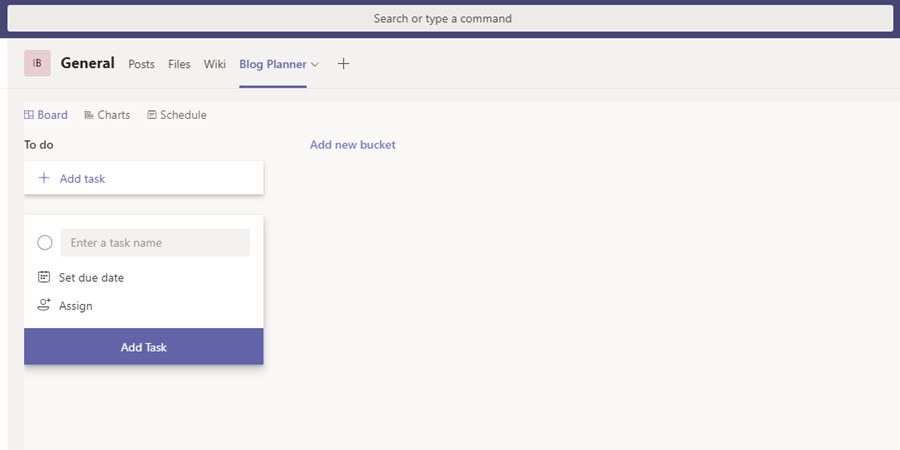
Populate Your New Plan
Once you name your plan, it will take a few seconds to generate. Once created, you can immediately begin adding and assigning tasks.
How to Use Microsoft Planner Effectively?
We’ve come up with 8 productivity boosts to help you use Microsoft planner more effectively.
The key is to choose a project and get started. As you utilize the tool, you can expand to other features!
Without further adieu, the boosts…
Boost 1: Bucket Your List
Your first step towards a more productive work life is nice and simple. In fact, it starts by filling your “buckets.” Microsoft Planner lets you create buckets for various tasks.
Within that bucket, you can create specific assignments. There are two basic options for these assignments. The first allows you to assign specific topics to specific employees. The second allows you to create assignment cards that employees can grab at will.
No matter how you handle assignments, placing everything into organized buckets is a great way of managing different tasks all at once.
Boost 2: The Calendar Is Your Best Friend
The calendar feature of Microsoft Planner is one of the simplest features. Nonetheless, this is one of the most important features for keeping everyone on task and on schedule.
While the calendar is great by itself, you can also use it with the Planner app for your mobile device. This allows a manager to access various calendars on the go with just the touch of a finger.
For items in the calendar, make sure you assign both due dates and a specific task owner. This helps individuals know who is responsible for what and also whether or not they are on schedule.
Boost 3: Measure Task Progress
There are many bells and whistles in Microsoft Planner for helping you to assign tasks and monitor progress. However, one of our favorites is a good, old-fashioned checklist.
Whoever makes the assignment can also create a checklist. This checklist should be a straightforward list of necessary actions for this project. As the assigned user works their way through the project, they can check off individual items on the list.
They can also leave notes for you or anyone else about project developments, potential delays, and lingering questions. Ultimately, every assignment in every bucket can have a checklist. This lets you easily monitor progress on every project you are supervising.
Boost 4: Different Ways to Categorize
The different task cards can actually be tagged with color-coded labels. You can assign various meanings to these labels to help you categorize projects.
One simple way to categorize everything is by priority. For example, you might split things up into “low-priority,” “medium-priority,” and “high-priority” based on deadlines.
However, if you create cards that employees can claim at will, you may want a different category system. You may be better off categorizing by effort instead of by priority. If something can be knocked out in a day, it may be marked as “low effort.”
Meanwhile, a project of a week or more might be marked as “high effort.” This helps employees efficiently knock projects out without overloading themselves with too many difficult assignments.
Boost 5: Using “Group By” the Right Way
Just like you have multiple options for categorizing, you have multiple options for grouping buckets.
Finding which method works for you will help you unlock a more productive and efficient office. You can group by due dates as an alternative to checking the calendar.
This lets you quickly visualize upcoming projects and check the progress accordingly. You can also group by progress. This allows you to see how far along each project is and to reallocate resources to any projects that are lagging.
It may take some trial and error to see what works best. However, finding your grouping groove is well worth it.
Boost 6: Make It Visual With Charts
If we’re being honest, many of our eyes glaze over when it comes to analytics and super-detailed information. That’s why it’s important to make everything visual whenever possible.
Microsoft Planner allows you to convert many sets of data into charts. Such charts are visually appealing and make it very easy to monitor project progress.
Both supervisors and employees can use the Planner to see charts and graphs about bucket progress, completed projects, and more. The same information is presented on the side of the screen for those who would prefer scanning through lists.
Making project progress visible to all team members is a great way to help the entire team understand the big picture.
Boost 7: Microsoft Planner Integration With Office 365
Sometimes, employees are resistant to learning a new app. One of the best ways to overcome this hurdle is to integrate something new with the technology they are already familiar with.
With Microsoft Planner, you can actually integrate with Office 365. This allows you to use 365 to give project access to everyone within a certain group.
Furthermore, you can take advantage of Office 365’s own calendar and remind features. This helps keep your employees focused and on track every time they open up their e-mail.
At the end of the day, this integration helps convert wary employees to Microsoft Planner while boosting overall efficiency.
Boost 8: Connect To The Cloud
Be honest: has your business been slow to integrate into the cloud?
If that’s the case, Microsoft Planner may be the final push you’ve been waiting for. Members of the team can upload various files as attachments to different projects and cards. These attachments may come directly from their desktop computer or from OneDrive or URL links.
Once the file is attached to Office 365 Planner, everyone has access to it via the cloud. You no longer have to worry about vital information being stuck in different silos and unavailable to the rest of the group. Obviously, quick access to all vital files helps everyone collaborate on projects that much more easily.
How to Use Microsoft Planner: Efficiency Now
Now you know more about how to use Microsoft Planner. But do you know who can improve the efficiency of your entire organization?
We specialize in Sharepoint, Office 365, Cloud services, and more. To see how our consulting services can transform your business, contact us today!
